
|
Low-Profile Chassis Front-Panel Inserts | |
Mini Tower Chassis Front-Panel Inserts |
Empty drive bays contain a front-panel insert to protect the inside of the computer from dust particles and also to ensure proper airflow within the computer. Before you install a drive in an empty drive bay, you must remove the front-panel insert.
To remove the insert covering the 5.25-inch bay, perform the following steps:
 |
CAUTION: Before you remove the computer cover, see "Safety First—For You and Your Computer." |
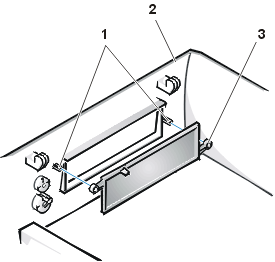
Figure 1. Removing the Front-Panel Insert for the 5.25-Inch Bay (Low-Profile Chassis)
 |
|
To replace the front-panel insert for the 5.25-inch bay, work from inside the cover. Position the insert behind the bay opening, insert the two ring-tabs (see Figure 1) over the posts on the inside of the opening, and firmly press both ends of the insert into place.
To remove the insert covering the 3.5-inch bay, perform the following steps:
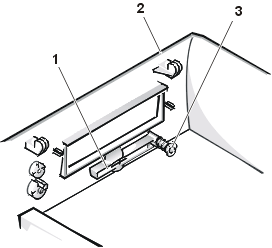
Figure 2. Removing the Front-Panel Insert for the 3.5-Inch Bay (Low-Profile Chassis)
 |
|
To replace the front-panel insert for the 3.5-inch bay, work from outside the cover. Place the insert in position and press it into the opening.
Empty drive bays contain a front-panel insert to protect the inside of the computer from dust particles and also to ensure proper airflow within the computer. Before you install a drive in an empty drive bay, you must first remove the front-panel insert.
To remove the insert covering a 5.25-inch bay, perform the following steps:
|
CAUTION: Before you remove the computer cover, see "Safety First—For You and Your Computer." |
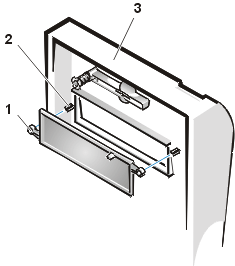
Figure 3. Removing the Front-Panel Insert (Mini Tower Chassis)
 |
|
To replace a front-panel insert for a 5.25-inch bay, work from inside the bezel. Insert the two ring-tabs (one on each end of the insert) over the posts on the inside of the bay opening, and firmly press both ends of the insert into place (see Figure 3).
To remove the insert covering the 3.5-inch bay, perform the following steps:
To replace the front-panel insert for the 3.5-inch bay, work from outside the cover. Place the insert in position, and press it into the opening.